How’s the app gonna look like
You will create a complete translator app that translates in more than 90 languages in this tutorial. You can either publish your own version of the translator app (with some changes) or you will be able to add a translation feature to any app after completing this tutorial.
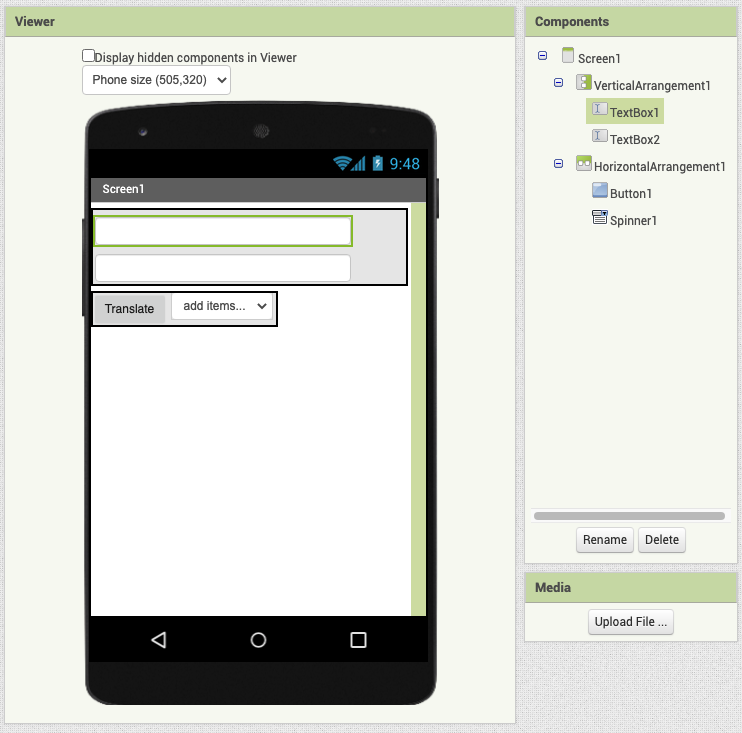
Our app will look like this,
It is simple because I don’t want to waste your time designing the app.
How the app works
The workflow will be as follows:
- The user enters the text in a text box;
- The user can select the language from a spinner component
- After that he clicks a button;
- And The translated text will be shown in another text box.
So, this is how simple the app will be.
Designing the app
To design the interface:
- Log in to MIT App Inventor 2 and start a new project.
- Add a Vertical arrangement layout component and add two TextBox components in it.
- Now, change their properties for a better look, as follows:
- Vertical Arrangement: H=18% & W=98%
- Text Boxes: H=7% % & W=80% (Choose anything less than 100% to maintain some padding)
- Hint for Text box1 = Type here
- Then, add another horizontal arrangement.
- Add a button and spinner in it.
- Change the Button1 text to “Translate”.
So, this completes the process of designing the app. However, let us make a few more adjustments
Changing the component names
It is difficult to realise the components using their default names hence, I have changed their names to the following
- TextBox1 to FromLang (You need not mention the component type in its name like From language Text box, because a small icon beside its name explains what component it is?)
- TextBox2 to ToLang
- Button1 to Translate
- Spinner to listofLang

There are only two arrangements and we can easily recognise them hence, you need not rename them.
Details and Pricing of Yandex translate API
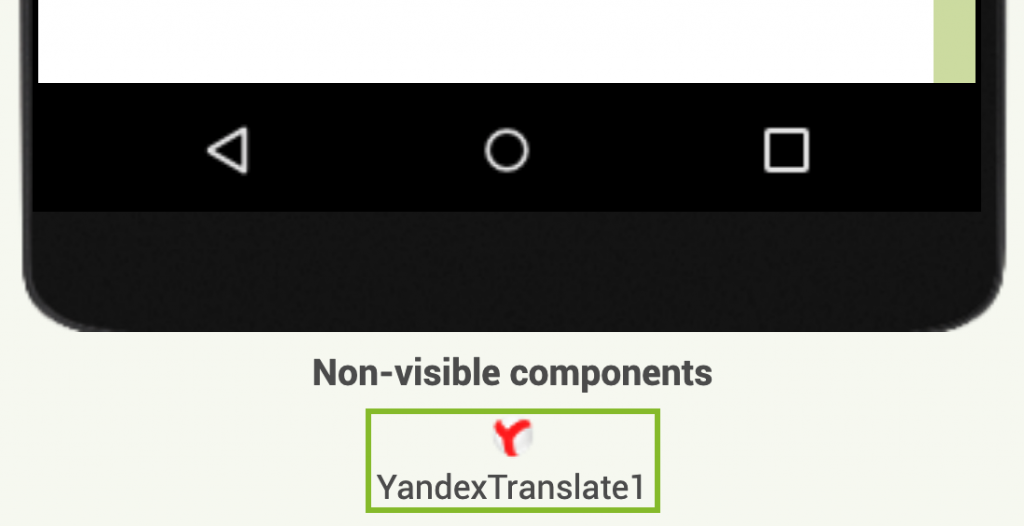
We have added different user interface components but, to translate we need one more component from the media section i.e; Yandex translate component. Hence, add it on to the viewer. This component works in the background with the Yandex translate API so it doesn’t occupy any space on the Screen.
What is Yandex Translate API
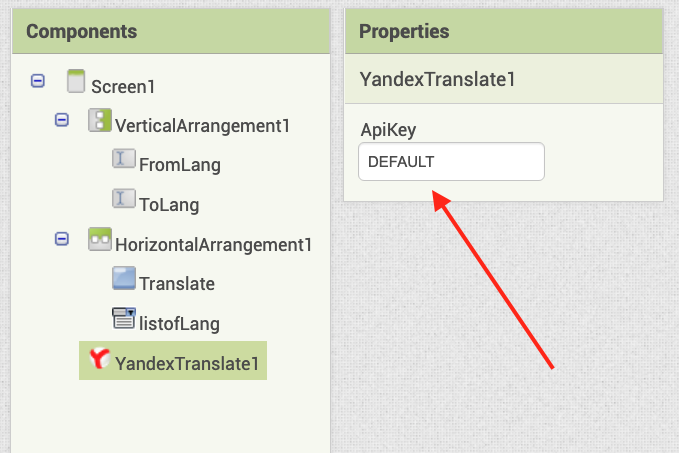
In the properties section of this component, you will find an option to add a Yandex key. It is an API key which acts as authentication for Yandex translation API service. An API key is compulsory to use their service in your apps.
To know more about what an API Key is, watch this video.
By default, App Inventor has added a key to use Yandex translate service. It works well while testing the app. But, for uninterrupted service, you need to use your own API key.
Till now, we have added the components with a simple and basic design, changed their default names for better understanding and added the Yandex translate API. Now, let us find more about Yandex translate service and How to create an API key for our translation app.
Creating a Yandex translate API key
In order to know more about Yandex translate API, we need to visit its Web site. Just make a quick search on Google saying Yandex Translate API.
You will most probably find its link in the first result. Its https://yandex.com/dev/translate
- Here you have two buttons
- Documentation
- Commercial API
- Ignore those two buttons and scroll down, you will find four-steps to getting started with Yandex Translate API.
- First, try using Yandex translate service on its website. Play around and get a good idea about the standard of its translation feature.
- Next, read its Formatting Rules, it is basically the information on how to give credit to Yandex translate service. Note: It’s compulsory to give them credit according to its Terms and service hence, follow this carefully.
- The text Translated by Yandex.Translate must be added above or under the translation with a clickable link to http://translate.yandex.com.
- Requirements for text placement. The text must be displayed:
- In the software product description.
- In the software product help.
- On the official site of the software product.
- On all pages or screens where service data is used. So, this means you need to credit them wherever you are using their service, explaining the service, support page and any marketing materials.
- Font colour requirements: The font colour of the text must match the font colour of the main text.
- Font size requirements: The font size of the text must be at least the same as the main text.
- Now let us talk about API key,
- Yandex has recently closed the option for a free API key
- You need to pay a minimum amount of 15$ to use their service.
- The pricing system is as follows:
- For characters less than 50,000,000 you need to pay 15$ per 1 million characters.
- From 50,000,000 to 100,000,000 characters you need to pay 12$ per million characters and so on…
- Which means if you have used 75,000,000 characters then, you need to pay 50 x 15$ + 25 x 12$ = 750 + 300 = 1050$. For more details visit this page
- In order to get an API key and start using their service, you need to add the account information and payment details. After that, you shall make a down payment of remuneration for the right to use the program “Yandex.Translate” API (the Program) during a calendar month (the Reporting period). Payments shall be effected in US Dollars. This may be an amount of 15$, as its the minimum amount to pay.
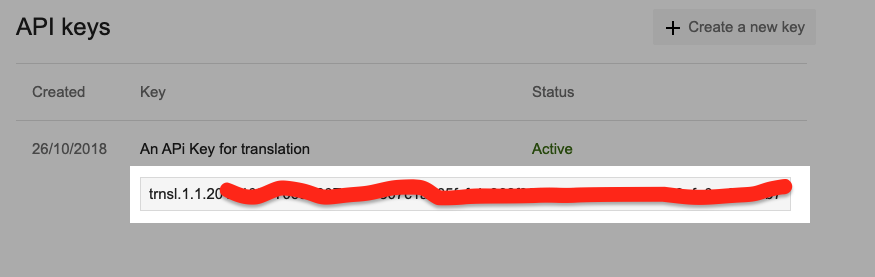
- An API key will look something as shown in the below image.
You need not create the API key to follow this tutorial. For now, you can continue with the Default key provided by App Inventor 2. However, at the time you are sharing your app to the world, an API key is important.
- Finally, Click the Documentation button
- There is a lot of information on how to use the API however, you need not bother to read it because App Inventor provides a Yandex translate component which is ready to use with its blocks.
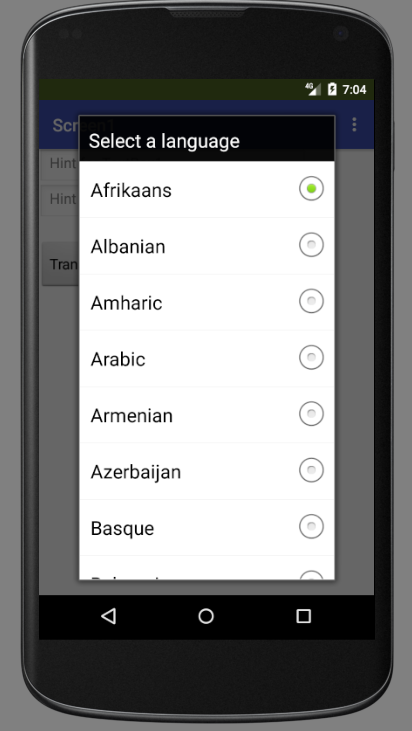
- Go to the overview section. Here you will find the list of languages that are supported by Yandex translation service.
- To provide translation service to all these languages we need to format this table into two comma-separated lists. One list for languages and other for language codes. This lists should be arranged in the same sequential order. The other way of getting this list of languages directly in your app is by using a Web API component. But, using a web API component is more complex than creating Comma-separated lists of languages.
You need not even bother to create Comma-separated lists because I have created them for you. Download it here…
At this point in time you may have a question i.e; Why do we need to create lists of languages and language codes?
Why do we need to create lists of languages and language codes?
Your app users understand language names but, the Yandex translate API understands the language codes. We need to create a bridge between the user and API using different blocks in App Inventor 2. In that process, you will need Lists of the languages and list of language codes arranged in the same sequential order. But, to know exactly where you are going to use them, you need to wait till the end of this tutorial.
It’s time to translate
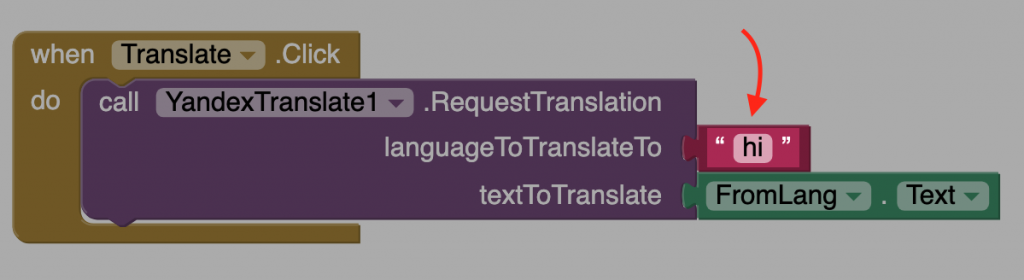
Our app will ask the Yandex Translate API to translate the given text when the user clicks the translate button. So, first, drag the event block called when Translate.Click.
Then, to call the Yandex translate API we need to use the method block as shown in the below image.
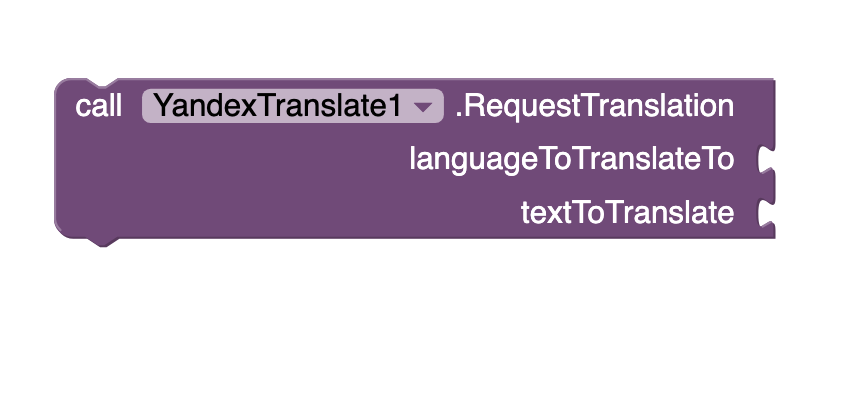
It has two sockets. In the first socket, you need to add the language code of the language to which the text needs to be translated. In the second socket, you need to provide the text that needs to be translated.
For now, just drag a blank text box and add a language code of any language that you want to try to translate to. I am going to add “hi” which is the language code of Hindi. Then, in the second socket attach the block FromLang text from the FromLang TextBox. Then, attach this combination of blocks to when Translate.Click event block.
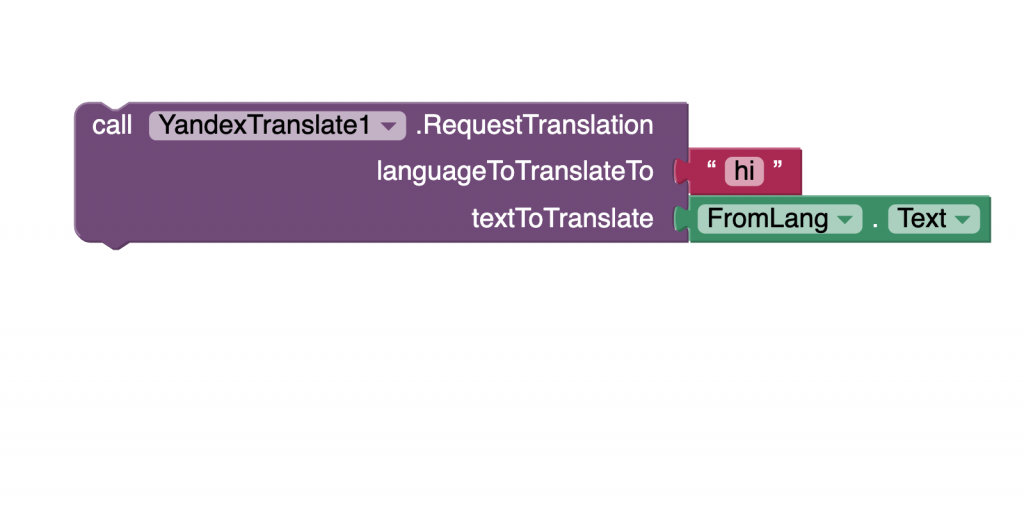
So, whenever the user adds some text in the FromLang TextBox and clicks the translate button, our app will call the Yandex translate service to translate the text into a given language(which is Hindi in my case).
After Yandex translate service translates the text it will send the translation to our app. The translation will be available with a variable attached to when YandexTranslate.GotTranslation event block.
The event triggers whenever your app receives the translation or just a response code. A translation variable included with this event block gives the translated text.
We want to show this translation to the user with the help of ToLang TextBox. So, drag the block saying Set Tolang.Text to, attach the translation variable to it and connect this set of blocks to the when YandexTranslate.GotTranslation event block.

Now it’s time to test the app. Open App Inventor companion and try to translate the text without selecting the language in the spinner.
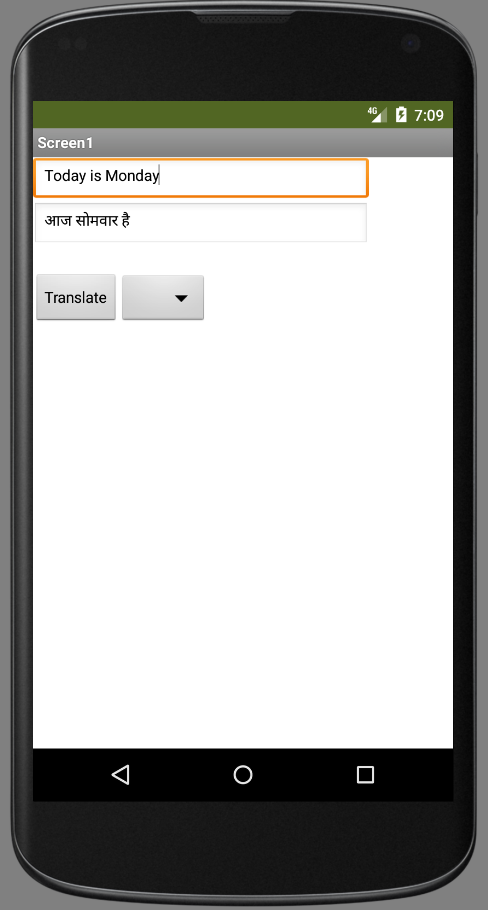
Hurray! The app works.
Now we have to still add this translation functionality to 90 languages. Keep reading to know “how to add translation to multiple languages”.
Translate into multiple languages
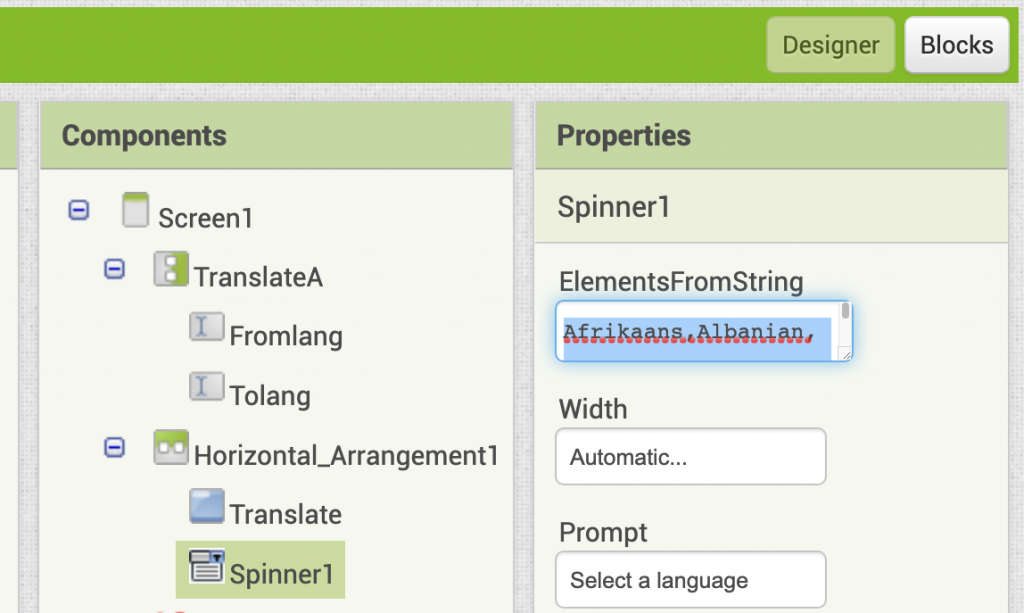
To add the languages in a spinner open the list that I have shared. There are about 90 language names and laguage codes supported by Yandex translate API. Copy the comma-separated list of language names. Select the spinner in the App Inventor 2 designer tab. Paste the language names under ElementsFromString option in the properties tab.
Now let us test the app.
Open the spinner and you will see a dialog box or a drop-down with the list of languages.
Select any language and try to translate the text. You must probably observe that it is yet translating to the language that we have tested earlier.
The reason behind this is simple: go to the blocks section and you can see in the method block where we are calling the Yandex translate API, the language code is still the one we have added before. You have to understand that the language code attached here need to change. It should change according to the language selected in the spinner.
Hence, the challenge here is “How can our app select the language code based on the spinner selection?”
This is where the list of language codes is helpful;
I have shared the list of language codes which is arranged in exactly the same sequence as the list of language names used in the spinner. So, by finding the index of spinner selection we can find out its language code.
Thankfully, there’s a block with the spinner component, Spinner. Selection Index that will help us to find the index of the selected language name.
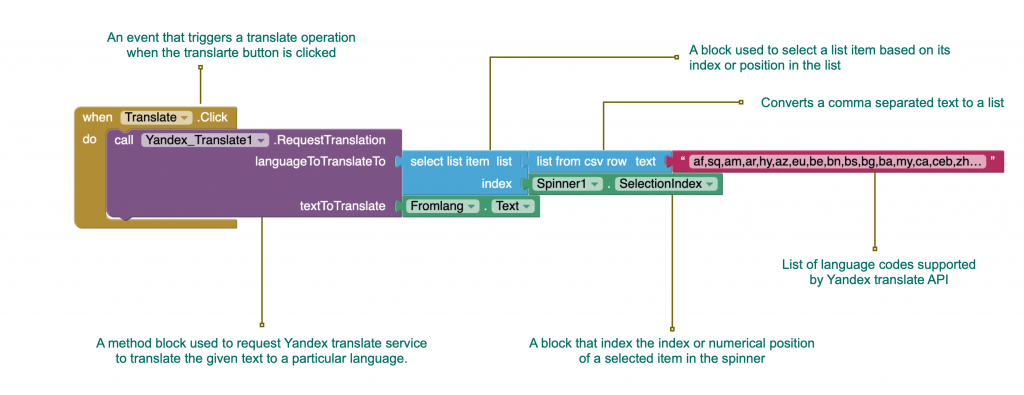
For our app, to exactly find out the language code of the language selected by the user, you have to use a few list blocks.
- To select the item from a list you need the following block: select list item list. Index;
- To add a comma-separated list in the blocks section you need to use the list from CSV row text block.
Add the list of language codes in a Text string block. For this Text string to act as a list connect it to list from CSV row text block.
Now, connect this list to the list socket of the select list item. index block. In the index socket, you can provide the index of the spinner selection by using a spinner. selection Index. So, this complete set of blocks will help the app to figure out the language code of the language selected using the spinner.
Connect this set of blocks to the language To Translate To socket of the method block used to call the Yandex Translate service.
Now, test the app. Select any language from the spinner dropdown and translate it.

Hurray! You have created an amazing translator app.
Giving credit to Yandex. Translate service.
As read earlier, it is compulsory for us to give credit to Yandex for using their translate service. So, now we shall give credit to them in our app. You should also make sure that you credit them at other places(your app’s landing page, your support page) as mentioned on their site.
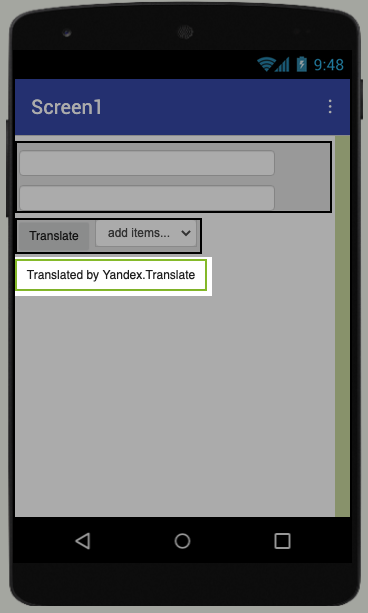
- Add a Button component
- Change its properties
- Change Button text to Translated by Yandex.Translate
- Its font size and font colour should be the same as that of the translated text.
- Change the background colour to None.
- Change components name to Yandex page
Now, to make this button clickable and to open the link provided, we need to use Activity starter. However, you can also do it in another way by adding a web viewer. But, we will use Activity Starter as it is simple and more comfortable for the user to follow other links on that page.
Add an Activity starter component. As this component works in the background, hence it doesn’t occupy any space on the Screen. For our app to open the website, follow the below procedure:
Set Action of Activity starter: android.intent.action.VIEW
Set DataUri of Activity starter: https://yandex.com/dev/translate
Drag When Yandex page button. Click block and connect start activity block to this event block.
Now try testing the app; The app will open the Yandex website’s link in a browser of your phone.
LEC6: Debugging: How to deal with the default language
Our app has a small problem, It doesn’t allow the user to translate the text to a preferred language by default. Which makes it uncomfortable to the user as he needs to select the language from the spinner every time he opens the app. We can solve this by asking the user to select a default language when the app runs for the first time.
We can ask the user to select the language using a spinner. Then, we can use this language as a default language to translate the text at any time in the future. Follow the below steps to implement this method.
- Add a TinyDB component.
- Create an arrangement that asks the user to choose the default language code when the app runs for the first time.
- Add a vertical arrangement.
- Set its height and width to fill parent.
- Add a spinner and add all the language names under the ElementsFromString option in its properties tab.
- Add a label to show a message “select a default language”.
- Save the default language using a Tiny DB
- Use After spinner selection event block
- Attach the method block of tiny DB to save the Spinner selection index. Give it a tag name, For Example, default language.
- Hide this arrangement by changing its visibility to false in the properties tab.
- You can hide this arrangement permanently after the user chooses the default language code.
- Use the Screen1. Initialize block
- Connect if-then-else block; extend it to else socket. In the if section check IF tiny DB’s given tag = blank text block then, Default language selection Arrangement visibility = true and remaining Arrangements visibility to False. Else, Default language selection Arrangement visibility = false and remaining Arrangements visibility to true + Set spinner1. Selection Index to Tiny DB given tags value method block.
- To When Spinner2.After selecting add the blocks: Default language selection Arrangement visibility = false and remaining Arrangements visibility to true + Set spinner1. Selection Index to spinner2. Selection index. These set of blocks will work when the user has not selected default language