Recently, a student of my course MIT App Inventor advanced course has asked me “How to delete multiple items of a list? “
Woah! Really interesting question. I was frequently experimenting with list blocks but, I never thought of selecting or deleting multiple. I don’t understand why I have never thought of it. However, I am very thankful to my student that he had asked me otherwise, I would have never written about it here.
Three ways of deleting multiple list items
You have three options to delete multiple items:
1. Select all items to delete
2. Select a range of items to delete(Ex: 2nd item to 5th item).
3. Select multiple items manually to delete
First 2 options are easy. For the first option, you can allow the user to select all the items by using a checkbox. And, for the second option, you can allow the user to enter the range of index values in two text boxes to delete
But, the third option of selecting list items manually requires more work. However, I have found a solution. You can see it below!!
It appears to be simple but it needs so many blocks. Hence, without wasting more time let us start the tutorial.
Create a List

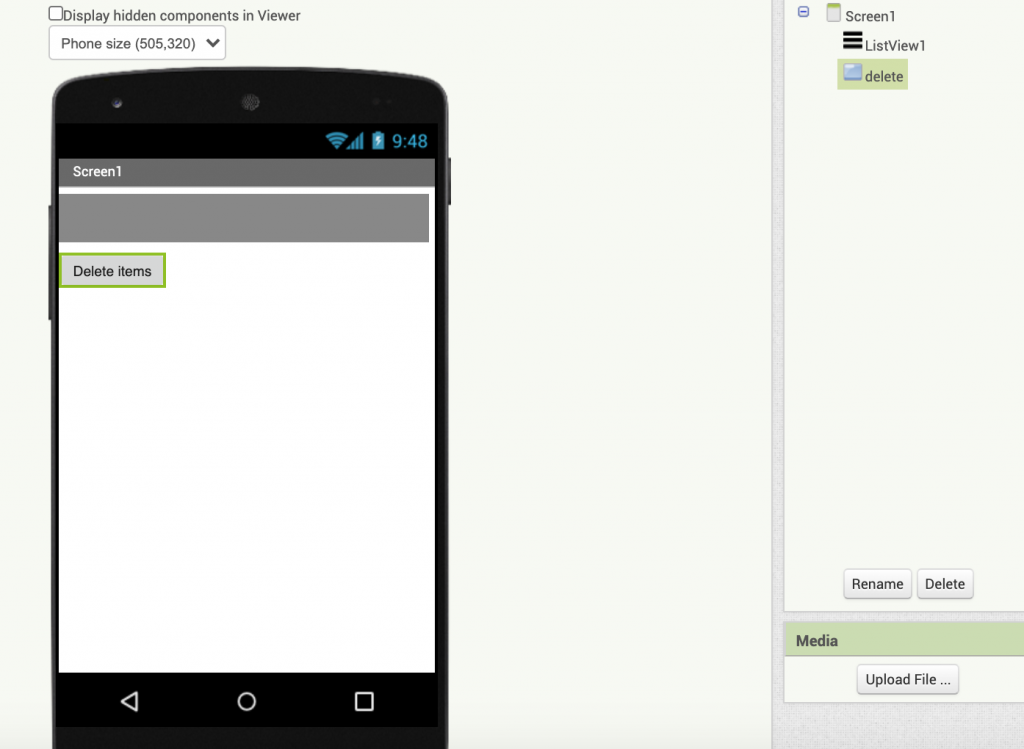
First, create a variable list with few items and display them using a List Viewer. In the above image, you can see that I have added a List Viewer. And then, in an image below you can see that I have created a variable list in the blocks section. I have named it as Mylist and added the following items: apple, mango, orange and banana. Finally, I have set the variable list items as elements of ListView1 using an event of Screen1.initialize.

Result: All the list items of Mylist will be visible on Screen1 through a ListViewer.
Enable delete mode
We shall use the same list to display the list items and to select multiple items to delete. We will allow the user to select items to delete when DeleteMode is enabled. DeleteMode is a phrase which I am using only for this discussion. It is just a boolean, which when set to true the user can select list items for deleting. So, create a global variable and name it as DeleteMode and initially set it to false.

A button will be used to Toggle DeleteMode from True/False. So, add a button, rename it to delete and change its text to Delete items.
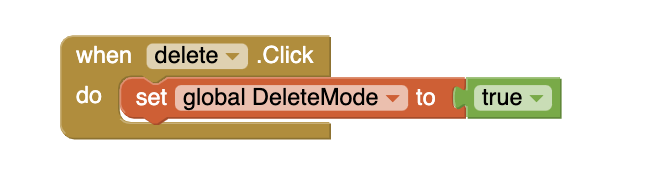
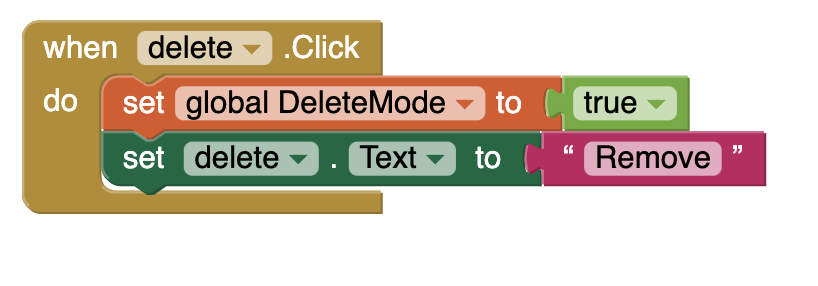
Drag when delete.Click | do event block and change the value of variable DeleteMode to true as shown in the below image.
Now, we should add the functionality of Multiple select.
How to add the functionality of multiple select
In order to enable the multiple select you need 2 features:
- Highlight the selected list items
- Store the index values of all the selected items.
Let us first talk about saving the index values of selected list items and then, we will discuss highlighting list items later.
How to store the index values of all the selected items
We shall create a new variable list to save the index values of selected items from Mylist. These index values can be used later to delete multiple items. So, create an empty variable list. I have named it as indexofdelete.

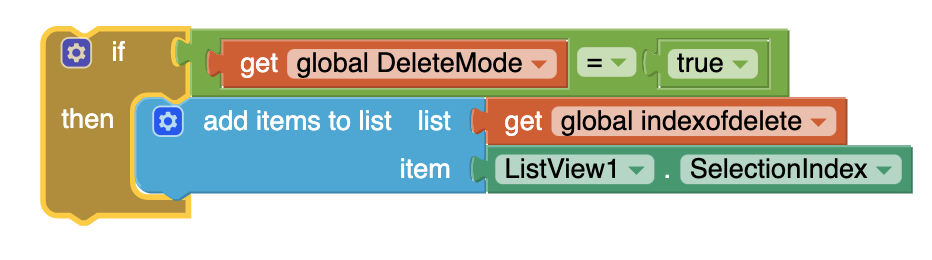
Now, whenever a user selects an item in DeleteMode, its index value will be added in this new list as shown in the below image.
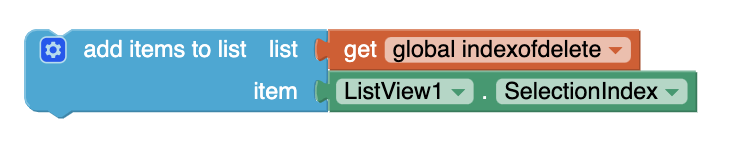
The adding of items to the indexofdelete list should happen only when DeleteMode is true. So, before adding the items check the value of DeleteMode using if | then block and add new items only if it is true as shown in the image.
How to highlight the selected list items
Generally, if you know javascript then, you can do this in a completely different way. But, as a non-programmer, I don’t want to go beyond the options provided within App Inventor. However, you can choose this method for selecting multiple list items by Taifun if you are ok with programming.
Only app inventor –
You can highlight the selected list items by changing their text and what better can you choose to replace than a text icon like this:
✘ ❌ ✖ ✕ ❎ ☓ ✗
So, I have replaced the selected list item with ✗ + Space + List item
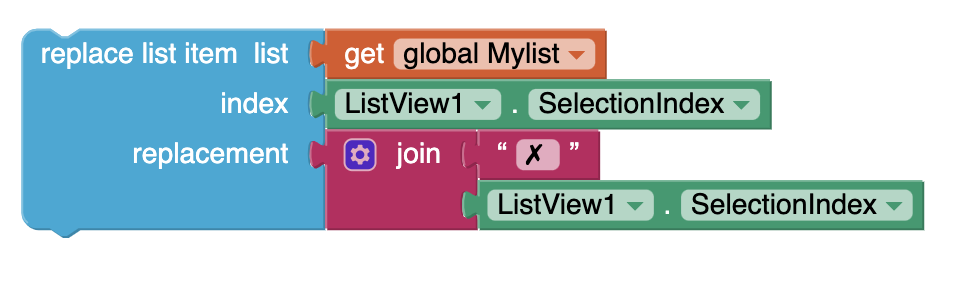
Note: I have added space within the first text string block with the”✘” icon.
Connect even this replace block to a if | then control block which we are using to check DeleteMode. And then, connect the if | then block to a when ListView1.Afterpicking | do event block as shown below.
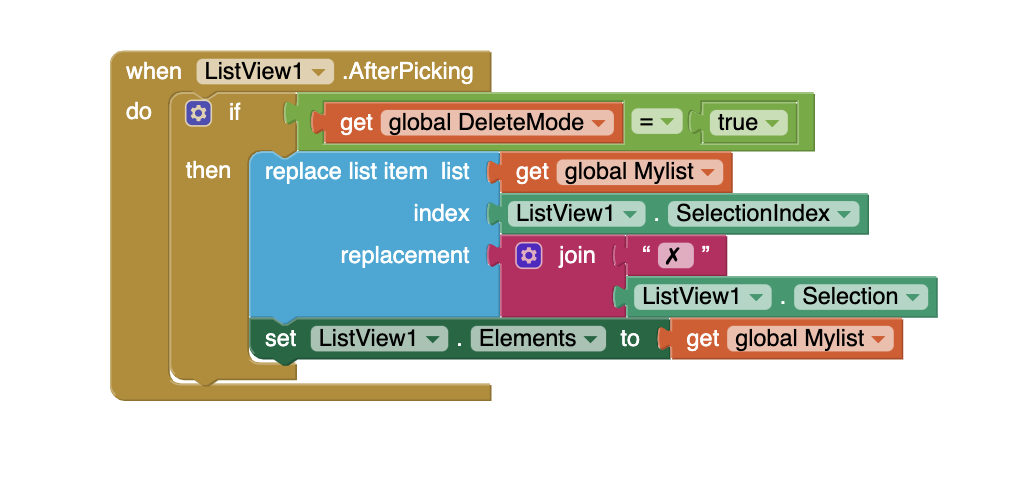
Notice, at the end of the blocks I have again set the ListView.Elements | to – Mylist; You need to add that block because the ListView1 is just showing the previous items of Mylist even after some of them have been replaced. To show the fresh items it needs to be reconnected to the new updated Mylist.
Now, test the app using an AI companion or an emulator. You must be able see how the list items are highlighted when you select them in delete mode. (i.e; after clicking the delete button)

Now, we need a button that allows the user to delete the selected list items. Instead of adding a new button let us use the same delete button that we have used to select list items. First, change the text of the button to delete or remove after it is clicked.
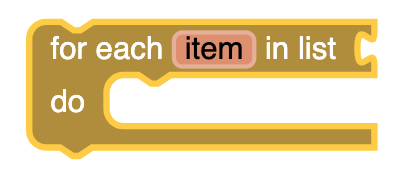
Now to remove multiple list items you need the following control block: for each item in list | do; It will run the operation added in the do section for every item of a given list.
To remove the list items use a remove list item block | index available in the list section.

We want the delete all the selected items by using the index values stored in indexofdelete list. So, in the list socket of for each item in list | do control block, attach the indexofdelete variable list. And then, in the do socket add remove list item | index block as shown below.
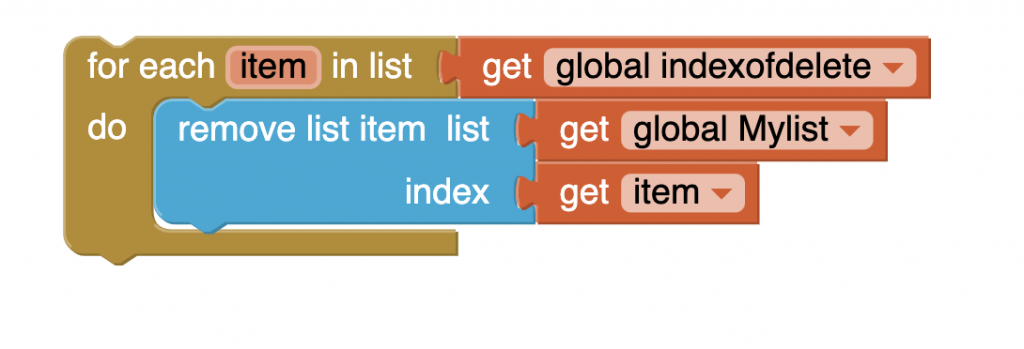
Note: In the above image the list connected to remove list items block is Mylist because it is the actual list from which the user wants to remove the list items. And in the index section, you need to just add the variable item that comes with the control block.
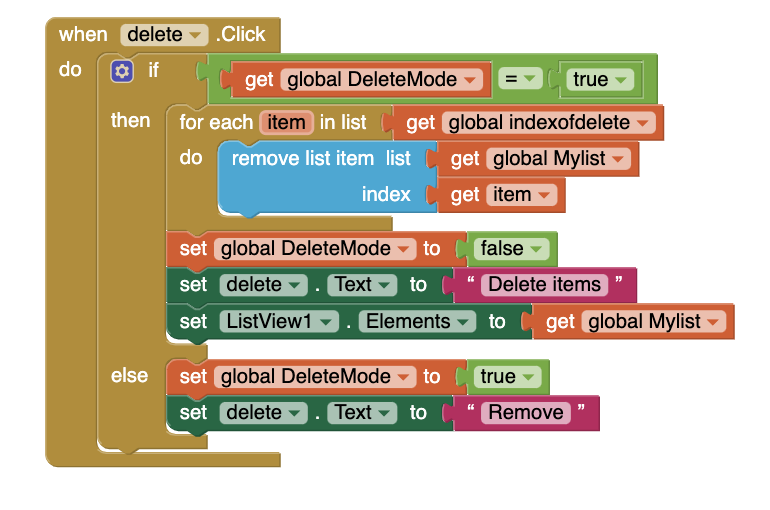
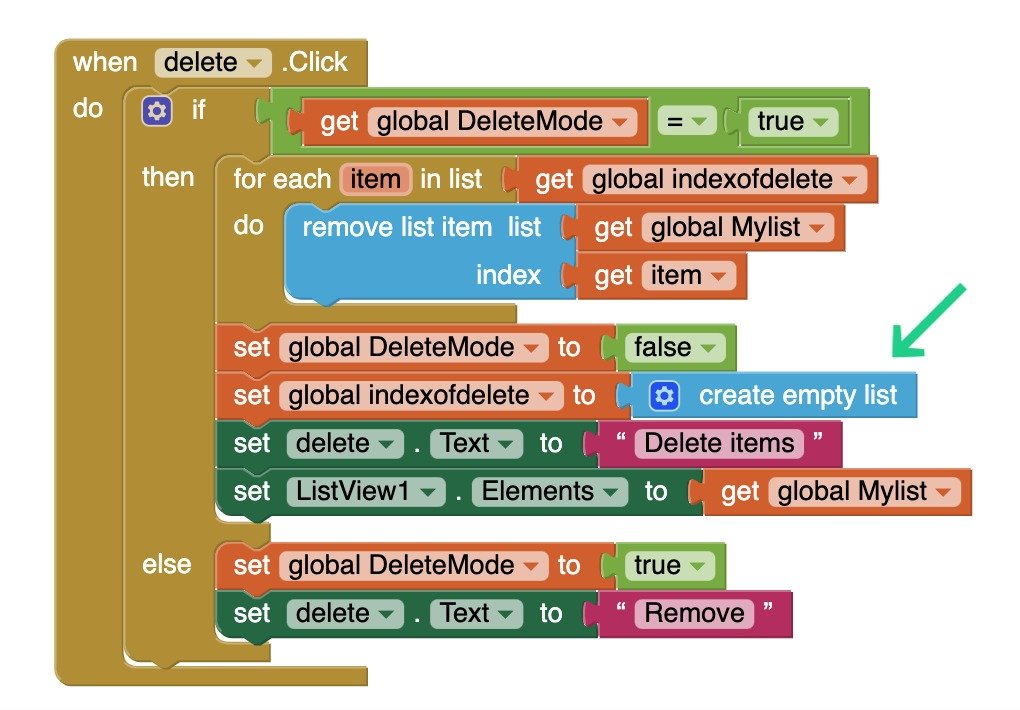
As we want to use the same delete button to run the above delete operation, we must be able to detect whether the DeleteMode is true. Therefore, we need to employ if | then block. In the If socket check if the DeleteMode is true. In case if it is true the app should run the delete operation hence, connect the for each item in list | do block in the then section. Apart from that when the items are deleted we need to get the delete button to normal function i.e; Delete mode should be set to false and the delete button should display Delete items as the text.
Extend the functionality of the if | then block by adding the else function. And in the else function add the previous blocks connected to the when delete.click event block i.e; Set Delete mode to true and Set delete text to Remove. And yes! Don’t forget to set the list items to the updated variable list after the delete function.
Now, test the app.
Yeah! Finally, we can delete multiple items of a list.
After all this hard work you may think everything is fine but, once you use the app you will encounter some errors. And even if there aren’t any errors there is always a scope to improve your app.
In the case of this app, you can see we haven’t cleared the list items of indexofdelete variable list. As a result, when you want to delete the items again, the app will show an error because the delete operation will also run for index values greater than the length of the list. So, connect the following blocks to the delete operation.

Following are the few improvements that I recommend:
1. Add the delete function directly without employing the delete items button.
You need to just remove the DeleteMode variable and directly employ the select list items operation to ListView1. Afterpicking | do without if | then control block.
2. Allow the user to deselect the items after selecting.
Use the if | then control block and check if the Listview1.SelectionIndex is there in indexofdelete list and in the then section remove the list item. The following block can be used to find an item of a list.

3. Avoid the select operation to work for already selected items.

This is an error and you can simply debug this by using the same suggestion given for 2nd improvement.
I hope you have found this answer helpful.
Thank you,
Eenjeen